
Welcome
I really started The Outdoor Gems to share outdoor experiences through photography and storytelling to inspire more people to get outside. If more people got outdoors; took a walk, hike, went snowboarding, sat around a campfire, and surfed in the ocean, I think the world would be a better place.
-Jeremiah
The Latest

Breckenridge Colorado, The ultimate hiking guide to Mohawk Lakes
If you’re looking for amazing hiking trails in Colorado, Summit County in the summer and fall will have some of the best hiking in the state. Old mines, alpine lakes, mountain views, and waterfalls are handful of reasons to wake up early to go hiking on a number of . Just outside of Breckenridge is a fun day hike and entry level
Disclosure: When you buy something through the Affiliate product links I have created below, I earn a small commission. I only promote products and companies I support as well as believe in.
Looking for easy trail navigation? Check out Alltrails; an app with trail reviews, navigation, and trail stats. Predownload trails in case of no service.
If you’re looking for amazing hiking trails in Colorado, Summit County in the summer and fall will have some of the best hiking in the state. Old mines, alpine lakes, mountain views, and waterfalls are handful of reasons to wake up early to go hiking on any one one of the many different trails in the area . Just outside of Breckenridge is a fun day hike and an entry level backpacking hike called Mohawk Lakes. No overnight permits needed and it’s a doable hike in one day.
In this post I’ll be going over how to get to Mohawk Lakes, trail details, what to expect, and overnight backpacking info. Alright lets do thisss.

Where is Mohawk Lakes
Located in the White River National Forest of the Rocky Mountains, Mohawk lakes is in Blue River Colorado, just outside the town of Breckenridge. Part of the Ten Mile Range, this trail is a favorite for locals and visitors. Other towns nearby are Fairplay, Alma, Frisco, Dillon, and Silverthorne.
Coordinates for the trailhead
How to get to Mohawk Lakes
The starting point for Mohawk lakes will be at the Spruce Creek Trailhead off of highway 9, 10 minutes south of Breckenridge. If you take I-70 or 285 you’ll end up on highway 9 and then turn onto Spruce Creek Road. From there you’ll pass by a number of houses in a neighborhood and drive up on a dirt parking lot. On the weekends the trailhead gets pretty crowded so try to get there really early or around noon to beat the crowds. It’s ok to park on the side of Spruce Creek Road as you’ll notice plenty of vehicles leading up to the trailhead on busier days.
Below I listed times and distances from major areas in Colorado to the trailhead.


Denver
I-70: 1 hour 45 minutes/84 Miles
285: 2 hours 10 minutes/106 Miles
Boulder
I-70: 2 hours 25 minutes/90 Miles
285: 2 hours 45 minutes/117 Miles
Colorado Springs
US 24 W to CO 9 N: 2 hours 8 minutes/103 Miles
Fort Collins
I-25 South to I-70 W: 3 hours 15 minutes/144 Miles

How long is the hike?
It really depends on your speed, but for day hiking it has taken me about 6 hours round trip to the top lake, which includes hanging out at each lake for a little bit. I’m sure it can be done in a much quicker time frame, it all depends on your speed.
Elevation Gain: 2,106 feet/642 Meters
Distance: 8.4 Miles/13.5 Kilometers
Difficulty: Moderate to Challenging
Trail Type: Out and Back

Can families with children do this hike
Definitely, I’ve seen a number of families on this trail with kids and even moms and dads with the backpacks that carry toddlers or infants in them.
Best time to Go
Depending on the snow year, End of June through late October. If we get a lot of snow that season, then the trails usually are not free of snow until late June. On the flip-side, if it starts snowing early in the fall, trails may not be as easy to hike, making it less enjoyable. I’ve been in September as well as in the summer and both are some of the best times of the year to hike this trail. Fall is a nice time in Breckenridge to hike any trail because of the leaves changing, so that’s also something to consider when deciding when to do the hike.
Like anything, weekends will be a lot busier as well as mornings. I would either try to go really early in the morning or mid day as long as there aren’t any afternoon thunderstorms in the forecast!

Are dogs allowed on the trail
Yep, you will see dogs along the way, most are off leash too. Always try to keep your dog in site if off leash, because there is plenty of wildlife in the area!

Can you Backpack this trail
Yep, it is a great trail if you just got into back packing and want to test out your equipment and get use to your pack. No overnight permits are required and you also do not need an overnight parking pass to leave your car at the trailhead. Make sure to check fire restrictions in the area if you decide to build a campfire!


Trail Details and how to access the Upper Lake
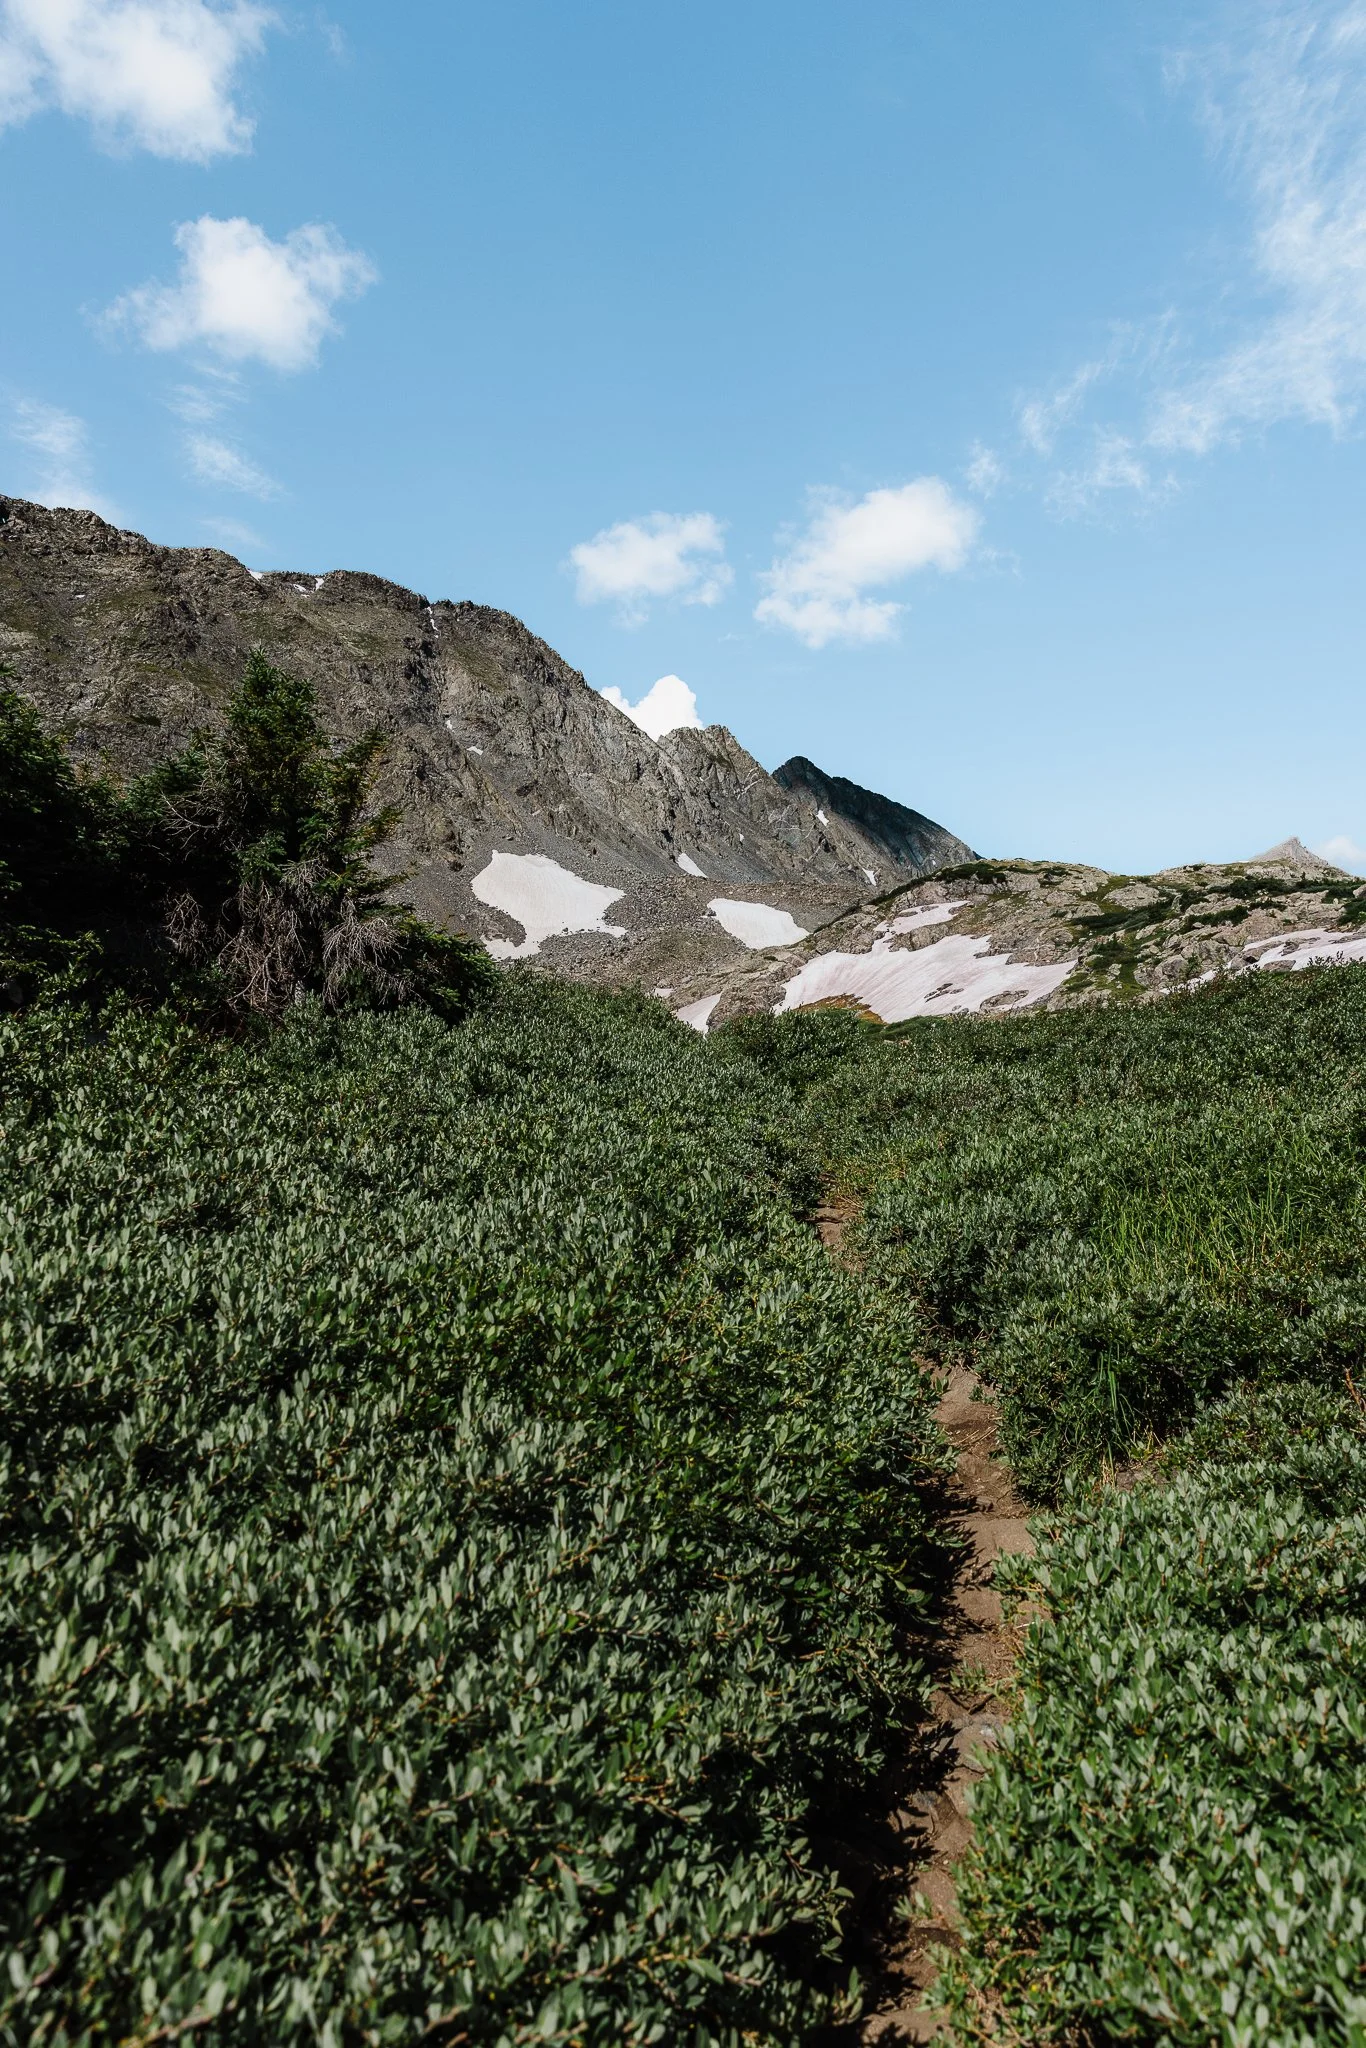
Once you’ve parked your car you’ll want to look for the Spruce Creek Trailhead, located on the left side of the road right after the main parking lot area. This part of the trail takes you through a wooded area until you reach the first lake. As you walk through the woods, you’ll pass by an opening on the right side that opens up to some of the best views of the hike, overlooking part of the Ten Mile Range. This is also a perfect resting point if you aren’t use to the elevation!


From there you’ll continue on the Spruce Creek Trail until you hit Spruce Creek Road (the same road where you initially parked, but much farther up the mountain). This road will take you to the start of the Mohawk Lakes Trail:) The first lake you’ll come up on is Mayflower Lake, follow the signage for a slight detour on the Mayflower Lakes Trail to access this lake.


Once you get back onto the Mohawk Lakes trail the elevation gain gets a little more intense and it also becomes a little more difficult to know if you’re on the right trail or not. My best advice is to look either at a map on All Trails (download ahead of time due to lack of service) or to follow the signage and trail as best as possible. There will also be incredible waterfall views as you make your ascent to the Lower Lake. Lower Falls Vista will be near a couple historic mining structures, while Continental Falls will be on your way up to the lower Lake on the right side of the trail. Again, there will be signage along the way to access these waterfalls.


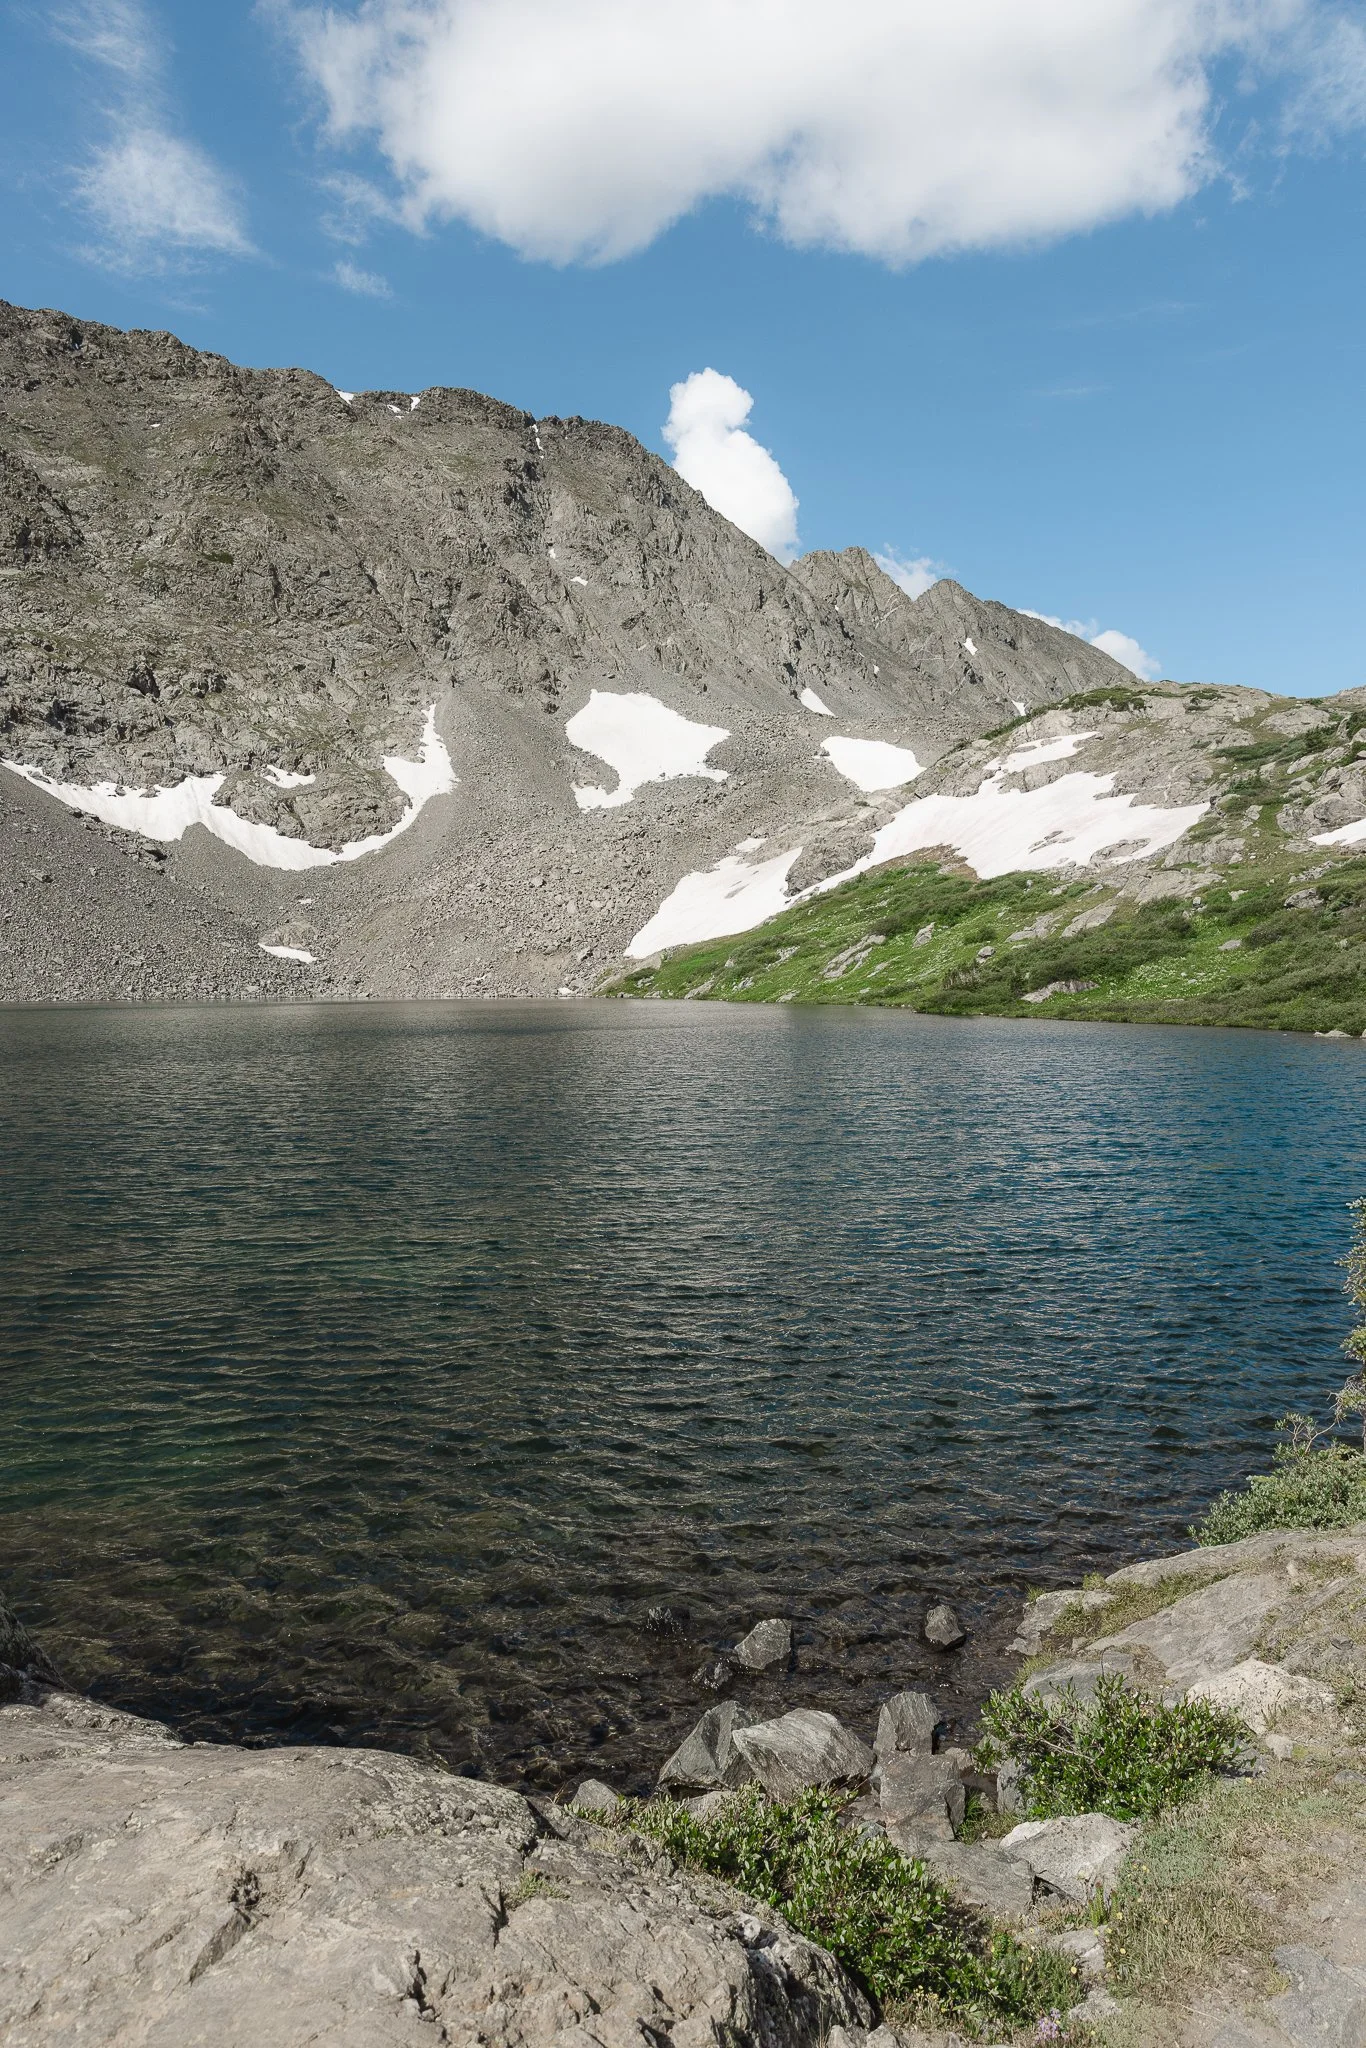
After you pass the waterfalls you’ll continue to hike up steeper areas of the trail. The trail will begin to level out and that’s how you know you’re approaching the lower lake. The lower lake has an open backdrop surrounding it, perfect for photography. As mentioned earlier this is a great spot to set up for camping if you back packed up to the lake. I didn’t hike to the top lake until the following morning, but if you set up camp early enough I’m sure golden hour at the upper lake is pretty special.
If you camped at the lower lake and are motivated enough, I would recommend waking up early to catch the sunrise!

best-backpacking-tents


Now that you’ve made it this far, keep going! and head up to the last part of the hike, the Upper Lake. This will be about 15 minutes from the lower lake and the climb isn’t too bad. You’ll hike one last small climb before you reach the top. There’s plenty of places at the top to take in the scenery, chill, and eat a snack. You’re also allowed to fish in the top lake as long as your Colorado Fishing license is up to date.
What to Pack
Rain Jacket- Weather shows up at any given moment in the Mountains, always pack a lightweight rain shell. Burton makes great rain jackets for men and women that have cool patterns and will keep you dry on your hikes!
Sunscreen- Hiking at a high altitude=increased sun exposure so make sure to apply this at least 15 minutes before you venture out. I like Sun Bum, which can be found online at Hansens surf shop out of Encinitas California.
Hiking Poles- Although these might seem “uncool”, they help a lot with balance and footing when hiking. Head over to REI or your local outdoor retailer, as they have a great selection.
Hiking Boots- Proper footwear is a must. There is a ton of options when it comes to hiking boots. These can also be found at REI or your local outdoor gear shop.
Outdoor Clothing- Although outdoor clothing can be expensive it does last a long time. It will be more lightweight, moisture wicking, and more stinkproof when doing stuff outdoors. Try to stay away from anything cotton. I personally like Fjallraven and Mountain Hardwear, but Patagonia, Burton, North Face, and Columbia all make great stuff.


The Descent
Watch your footing as you make your way back down the trail. Please note uphill hikers have the right of way. When you come to the point of taking the Spruce Creek trail back to the parking lot, there is also a service road, on your left, Spruce Creek Road, if you don’t feel like walking through the woods again. The road will probably be a little quicker, and also will take you back to the parking lot.
Please note, if you don’t feel like hiking all the way to the lower lake or top lake you can take a detoured trail (Mayflower Lakes Trail) from the first lake, back to the parking lot.
Watch your footing as you make the hike down as there are rocky, bumpy, and slippery areas. I would definitely do this hike again and I recommend it to anyone in the Summit County Colorado area that loves to hike.

Looking for more Colorado adventure? Check out Leadville, another small mountain town in Colorado not far from Breckenridge. Thanks for checking out the Blog and I’ll see you on the next post.

Summer boarding, The ultimate guide to Hiking the 4th of July bowl on Peak 10 in Breckenridge
Normally when someone thinks of summer, winter activities are the last thing that come to mind. If you do think of snowboarding, Mt Hood in Oregon or Coppers summer park in Colorado are probably what come to mind. However for the back country enthusiast looking to do something different, the fourth of July bowl on Peak 10 in Breckenridge Colorado is a way
Disclosure: When you buy something through the Affiliate product links I have created below, I earn a small commission. I only promote products and companies I support as well as believe in.
Back country Skiing and Snowboarding can be dangerous, even in the summer! Please have a plan, partner, proper knowledge, and equipment when going into the back country
Looking for easy trail navigation? Check out Alltrails; an app with trail reviews, navigation, and trail stats. Predownload trails in case of no service.
Normally when someone thinks of summer, winter activities are the last thing that come to mind. If you do think of snowboarding, Mt Hood in Oregon or Coppers summer park in Colorado are probably what come to mind. However for the back country enthusiast looking to do something different, the fourth of July bowl on Peak 10 in Breckenridge Colorado is a way to combine hiking and snowboarding (or skiing) for a fun back country summer day trip. If you’re not into summer skiing or snowboarding this is also just a great summer hike to do too.
In this post I’ll be going over how to get to the trail, what to expect, safety precautions, what to pack, and time frame for the hike. Alright let’s gooo..


Where does the Peak 10 hike start
First you’ll want to drive up the dirt road on Peak 9. If you head north on highway 9 to Breckenridge you’ll want to end up on Park Avenue and then take a right on Village road. You’ll then take a left into the Beaver Run parking lot about halfway up Village Road. Parking is free in the summer for those who have more then one car in their group.
You’ll want to have a good AWD vehicle as the road is somewhat rocky and steeper towards the top. If you’re vehicle doesn’t have good clearance I would park at the Peak 9 restaurant and start your hike from there. If you have good clearance you can drive all the way up to the green gate. Stay on the Peak 9 road all the way until you park. There will be a couple turn offs when taking the road, such as the Stables and Chair Lifts, but just stay on the road.

How long is the Hike
From your car to the top of Peak 10, it takes about 2-2.5 hours on the way up and about an hour back down if you ride the bowl, depending on your speed. Add about another 45 minutes if you only do the hike, without skiing or snowboarding. Below I listed some of the trail stats, starting from Mercury chair on Peak 9
5.8 miles out and back
2007 feet of elevation gain
Trail Coordinates- 39.474291, -106.049371
13,6340 feet peak elevation

What is the best time of day to go
The earlier the better, as afternoon thunderstorms can pop up in Breckenridge! Anytime you’re doing an exposed hike above tree line it is best to do it in the morning. This is also a safer time to ride the bowl as well because the snow is typically more stable. When things start to heat up that’s when you can see wet slides.
If you can time it right later in the evening would also be a good time to go as long as the weather is good. Golden hour would a pretty cool experience if you can pull it off!
Is it safe to do the hike and bowl solo
I would ride with a partner that you trust who has good back country knowledge and experience! Someone who also has their shovel, beacon, and probe. It will give you peace of mind when maneuvering some of the more technical parts of the hike and riding the bowl.

What should we pack
Since the 4th of July bowl is in the backcountry, I would pack you’re shovel, beacon, and probe to start as well as extra layers, sunscreen, and even bug spray. I’ve listed items below that would make this hike more enjoyable. The weather can be unpredictable in this kind of environment so I’ve listed items below to make your trip more enjoyable. Make sure you also have Hiking Poles! Right before you drop in you have do some rock scrambling and the poles will make all of the difference!
Hiking Shorts or Pants
Hiking boots
Mid-weight base layer
Water (Hydrapak works great)
Snowboard, Skis, and boots
Good Socks for Hiking and riding
Bug spray
Sunglasses/Goggles
A ball cap and beanie
A good hiking backpack. I really like the AK Dispatcher backpack to fit all of my backcountry equipment. It also has straps so you can keep your snowboard attached to the backpack
A pair of snow pants. You’ll throw these on at the base of Peak 10 as the temperatures start to get much cooler at this point in the hike. I personally like anything Gore-tex because it is a lightweight, durable shell.
Hiking Poles


What is the weather like
Thunderstorms in Colorado can show up in the afternoon, therefore you’ll want to get an early start for this hike. It also will start to get cooler as you get closer to the Peak. One thing you’ll also want to be cautious of is high winds. If it’s too windy at the top I would recommend turning around and trying the hike on another calmer day. I had to turn around my first try at this hike because of extreme winds towards the peak.
What is the hike like and what should we expect
What’s cool about this hike is you follow a service road in a series of switchbacks all the way to the top, so it isn’t confusing and a pretty smooth trail to the peak. As you make your way, you will come across a couple patches of snow at the bottom. This is where having a good pair of hiking boots and hiking poles will help! Because you’re at a high elevation it helps to have a lightweight jacket or long mid weight shirt.

After the snow patches you’ll hike for a little bit more until you reach the base of the summit where snowmelt is running down the mountain in the form of a creek. This is a good time to throw on your snow pants and take a break. Take in the views, drink some water, and eat some snacks if you packed them. This part of the trail is where there will be a number of switchbacks and about an elevation gain of 1,150 feet.


Once you hike to the top you’ll want to throw on your snowboard boots where there is a flat patch of snow. This will be right before you hike the ridge! It’s important to have your hiking poles at this point and you’re board strapped to the back of your pack. You’ll want to have the best footing possible for this. The top part down to where you drop will be all rocks so make sure to take it slow.


Once you get to the snow, find a good area to strap in and then pick a good line to drop. The turns will be slushy, but it’s still really fun. There’s even a few small jumps towards the bottom that you can hit if interested. Towards the bottom will be really slow, so you might have to skate a little with your back foot, with the other foot strapped into your board.
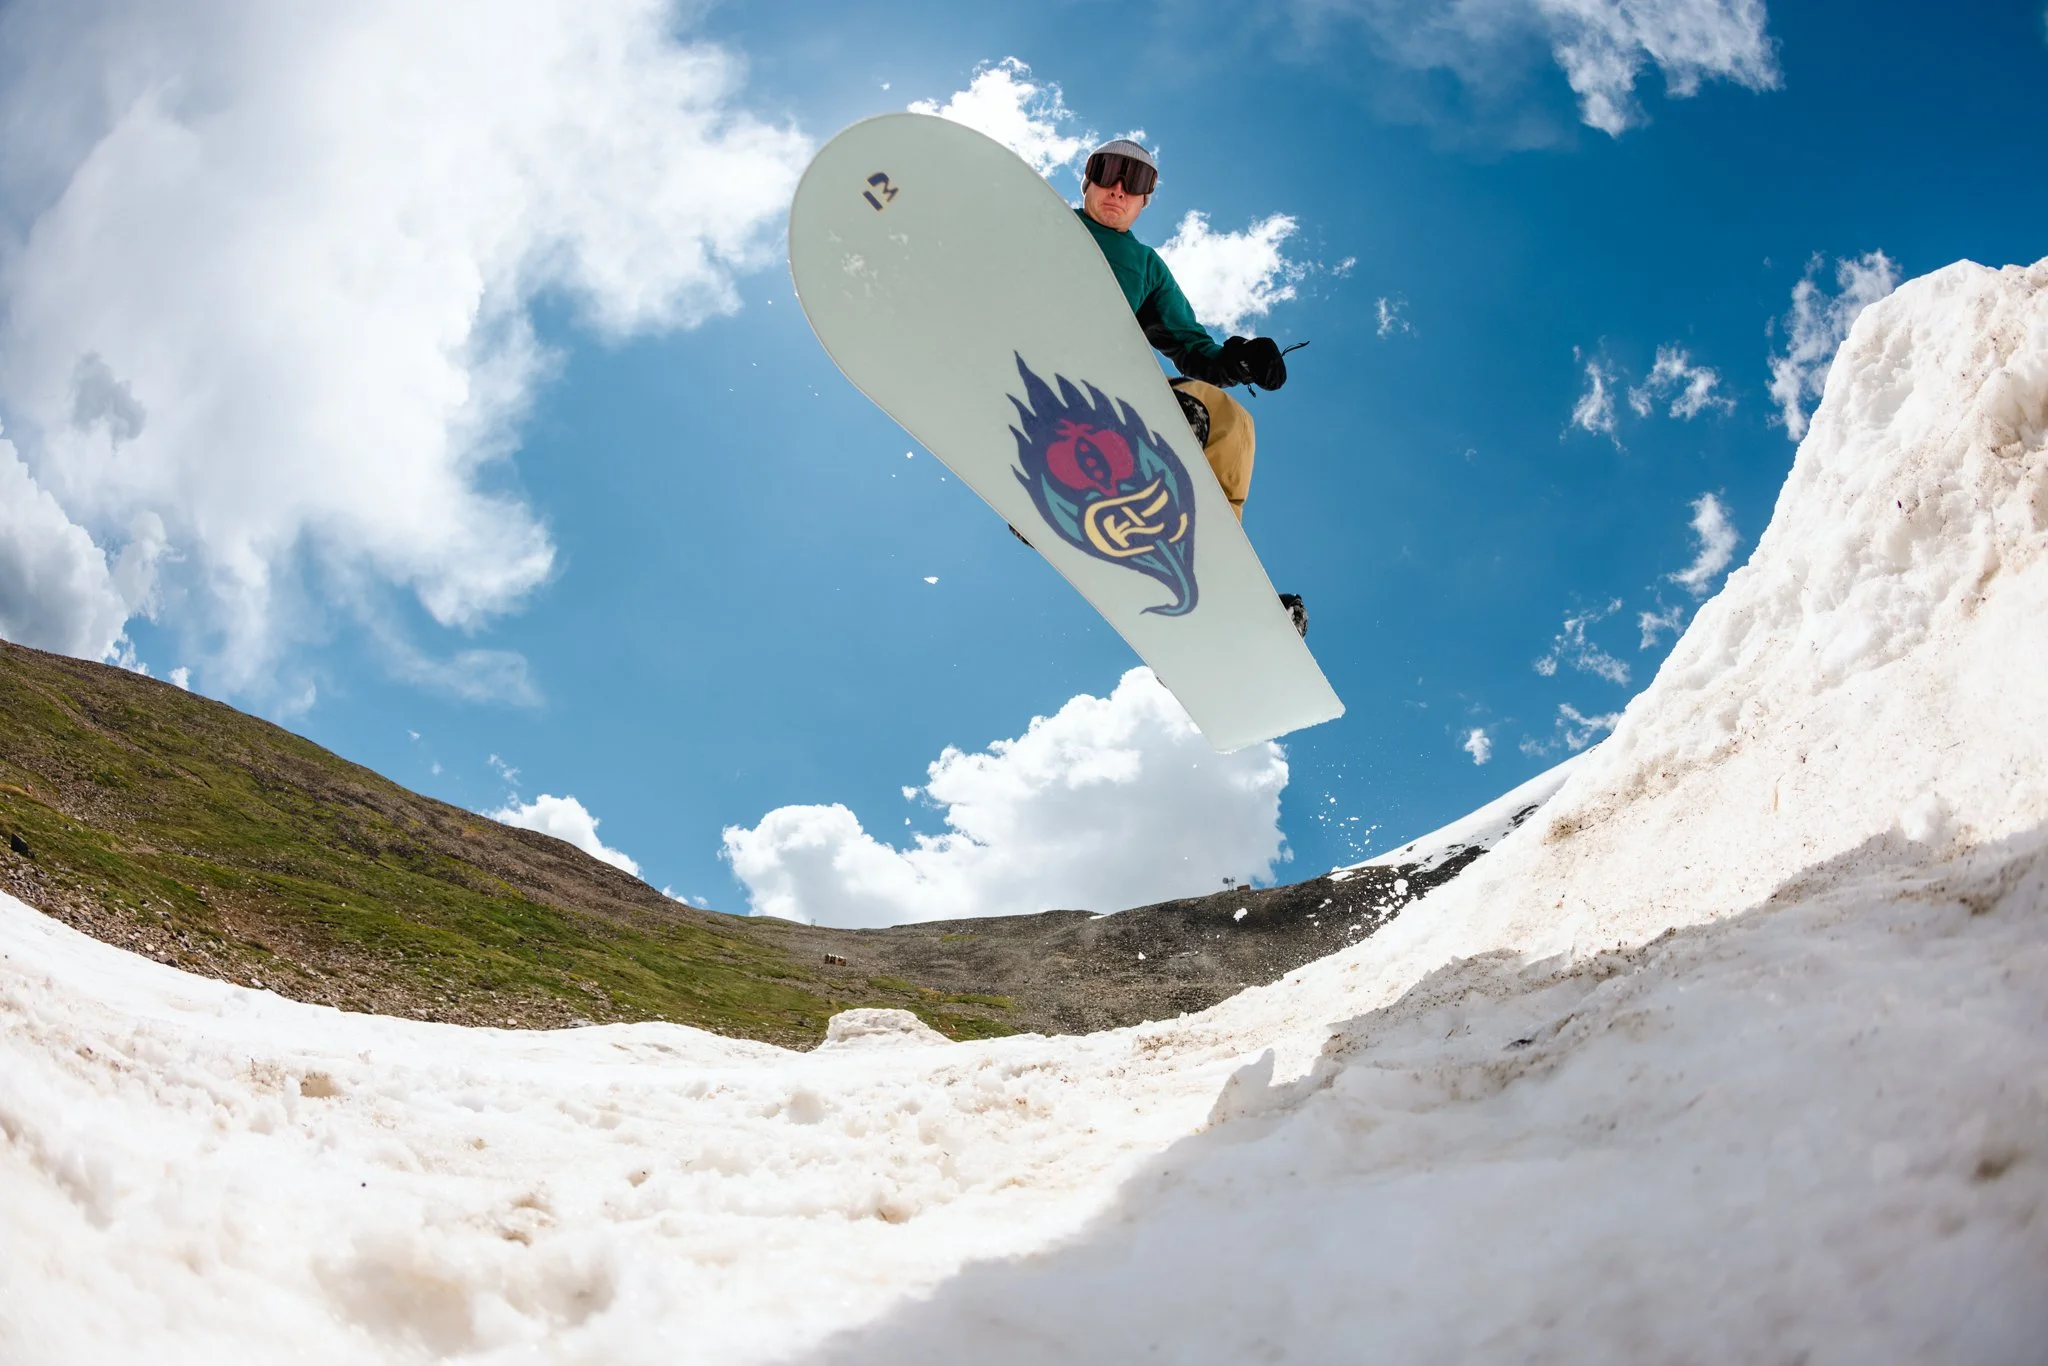
What is the snow like
The snow won’t be great, it will be hard to carve as it is pretty soft! However, overall it’s still a worthwhile experience to be snowboarding in July
What months can we ride the bowl or do the hike
If you are just looking to do the hike, the best time of year would be late May through late September. If you’re looking to ski or snowboard the bowl. Early June through Mid-July will be the best time of the summer. It all depends on snow coverage and how late of a winter season Colorado had. The snow starts to get pretty patchy around Mid July.

Should we hang out in Breckenridge after
There’s a lot to do in Breckenridge in the summer! Catch a local concert, walk around town, or grab happy hour at a local restaurant. My favorite place for happy hour is Aurum, on Ridge St., one street off Main. That’s the fun thing about doing this hike is.. you can do it early and then hang out in town after.


That’s it for hiking the Fourth of July bowl off Peak 10 in Breckenridge. If you have any questions or information to add, leave a comment below! Thanks for checking out the blog and I’ll see you on the next post.


Meet Jeremiah
Growing up, I loved being outside. I took a lot of cool trips with my family, whether it was camping, going to the beach, road trips, and national parks. Even though I didn’t fully appreciate those experiences at the time, as I got older I started getting more into the outdoors and traveling, reconnecting with my past. The feeling of traveling or going somewhere new always seems to give a sense of excitement or adventure.
Snowboarding and boardsports in general have been a passion of mine for over 20 years. I always loved the culture that came with it; from local retail shops to magazines and videos, to riding with friends as well as geeking out on the latest gear, it’s all part of the experience. After working in snowboard/outdoor gear shops for the past decade along with traveling to different outdoor places, I decided to put all of that experience in digital form to inspire and connect with other people.